This post is more for personal use than anything else. It is just a collection of code and functions to produce some of the most used experimental designs in agriculture and animal science.
I will not go into details about these designs. If you want to know more about what to use in which situation you can find material at the following links:
Design of Experiments (Penn State): https://onlinecourses.science.psu.edu/stat503/node/5
Statistical Methods for Bioscience (Wisconsin-Madison): http://www.stat.wisc.edu/courses/st572-larget/Spring2007/
Statistical Methods for Bioscience (Wisconsin-Madison): http://www.stat.wisc.edu/courses/st572-larget/Spring2007/
R Packages to create several designs are presented here: https://cran.r-project.org/web/views/ExperimentalDesign.html
A very good tutorial about the use of the package Agricolae can be found here:
https://cran.r-project.org/web/packages/agricolae/vignettes/tutorial.pdf
Complete Randomized Design
This is probably the most common design, and it is generally used when conditions are uniform, so we do not need to account for variations due for example to soil conditions.
In R we can create a simple CRD with the function expand.grid and then with some randomization:
 TR.Structure = expand.grid(rep=1:3, Treatment1=c("A","B"), Treatment2=c("A","B","C"))
 Data.CRD = TR.Structure[sample(1:nrow(TR.Structure),nrow(TR.Structure)),]

 Data.CRD = cbind(PlotN=1:nrow(Data.CRD), Data.CRD[,-1])

 write.csv(Data.CRD, "CompleteRandomDesign.csv", row.names=F)
The first line create a basic treatment structure, with rep that identifies the number of replicate, that looks like this:
The second line randomizes the whole data.frame to obtain a CRD, then we add with cbind a column at the beginning with an ID for the plot, while also eliminating the columns with rep.
 > TR.Structure
   rep Treatment1 Treatment2
 1  1     A     A
 2  2     A     A
 3  3     A     A
 4  1     B     A
 5  2     B     A
 6  3     B     A
 7  1     A     B
 8  2     A     B
 9  3     A     B
 10  1     B     B
 11  2     B     B
 12  3     B     B
 13  1     A     C
 14  2     A     C
 15  3     A     C
 16  1     B     C
 17  2     B     C
 18  3     B     C
The second line randomizes the whole data.frame to obtain a CRD, then we add with cbind a column at the beginning with an ID for the plot, while also eliminating the columns with rep.
Add Control
To add a Control we need to write two separate lines, one for the treatment structure and the other for the control:
 TR.Structure = expand.grid(rep=1:3, Treatment1=c("A","B"), Treatment2=c("A","B","C"))
 CR.Structure = expand.grid(rep=1:3, Treatment1=c("Control"), Treatment2=c("Control"))

 Data.CCRD = rbind(TR.Structure, CR.Structure)
This will generate the following table:
As you can see the control is totally excluded from the rest. Now we just need to randomize, again using the function sample:
 > Data.CCRD
   rep Treatment1 Treatment2
 1  1     A     A
 2  2     A     A
 3  3     A     A
 4  1     B     A
 5  2     B     A
 6  3     B     A
 7  1     A     B
 8  2     A     B
 9  3     A     B
 10  1     B     B
 11  2     B     B
 12  3     B     B
 13  1     A     C
 14  2     A     C
 15  3     A     C
 16  1     B     C
 17  2     B     C
 18  3     B     C
 19  1  Control  Control
 20  2  Control  Control
 21  3  Control  Control
As you can see the control is totally excluded from the rest. Now we just need to randomize, again using the function sample:
 Data.CCRD = Data.CCRD[sample(1:nrow(Data.CCRD),nrow(Data.CCRD)),]

 Data.CCRD = cbind(PlotN=1:nrow(Data.CCRD), Data.CCRD[,-1])

 write.csv(Data.CCRD, "CompleteRandomDesign_Control.csv", row.names=F)
Block Design with Control
The starting is the same as before. The difference starts when we need to randomize, because in CRD we randomize over the entire table, but with blocks, we need to do it by block.
 TR.Structure = expand.grid(Treatment1=c("A","B"), Treatment2=c("A","B","C"))
 CR.Structure = expand.grid(Treatment1=c("Control"), Treatment2=c("Control"))

 Data.CBD = rbind(TR.Structure, CR.Structure)

 Block1 = Data.CBD[sample(1:nrow(Data.CBD),nrow(Data.CBD)),]
 Block2 = Data.CBD[sample(1:nrow(Data.CBD),nrow(Data.CBD)),]
 Block3 = Data.CBD[sample(1:nrow(Data.CBD),nrow(Data.CBD)),]

 Data.CBD = rbind(Block1, Block2, Block3)

 BlockID = rep(1:nrow(Block1),3)

 Data.CBD = cbind(Block = BlockID, Data.CBD)

 write.csv(Data.CBD, "BlockDesign_Control.csv", row.names=F)
As you can see from the code above, we've created three objects, one for each block, where we used the function sample to randomize.
Other Designs with Agricolae
The package agricolae includes many designs, which I am sure will cover all your needs in terms of setting up field and lab experiments.
We will look at some of them, so first let's install the package:
 install.packages("agricolae")
 library(agricolae)
The main syntax for design in agricolae is the following:
The result is the output below:
As you can see the function takes only one argument for treatments and another for replicates. Therefore, if we need to include a more complex treatment structure we first need to work on them:
As you can see we have now three treatments, which are merged into unique strings within the function sapply:
Then we need to include the control, and then we can use the object TRT.Control with the function design.crd, from which we can directly obtain the data.frame with $book:
A note about this design is that, since we repeated the string "Control" 3 times when creating the treatment structure, the design basically has additional repetition for the control. If this is what you want to do fine, otherwise you need to change from:
to:
This will create a design with 39 lines, and 3 controls.
Other possible designs are:
Others not included above are: Alpha designs, Cyclic designs, Augmented block designs, Graeco - latin square designs, Lattice designs, Strip Plot Designs, Incomplete Latin Square Design
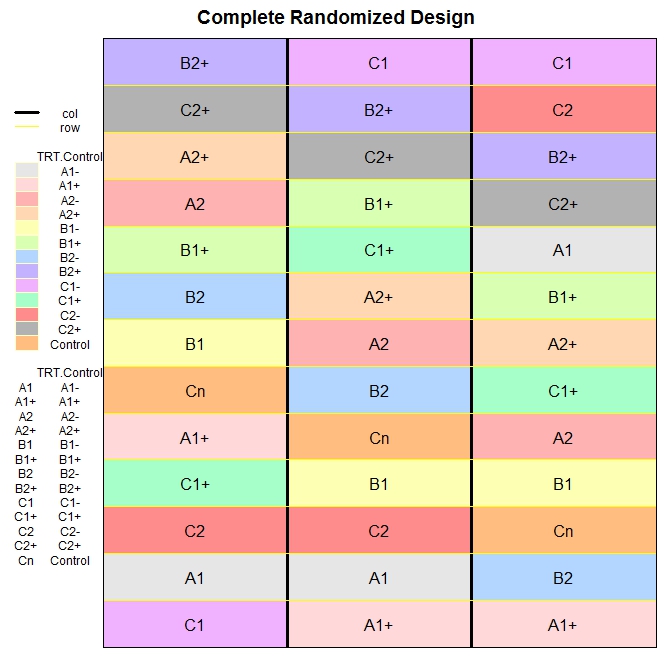
After installing the package desplot I created an example for plotting the comple randomized design we created above.
To use the function desplot we first need to include in the design columns and rows, so that the function knows what to plot and where. For this I first ordered the data.frame based on the column r, which stands for replicates. Then I added a column named col, with values equal to r (I could use the column r, but I wanted to make clear the procedure), and another named row. Here I basically repeated a vector from 1 to 13 (which is the total number of treatments per replicate), 3 times (i.e. the number of replicates).
The function desplot returns the following plot, which I think is very informative:

We could do the same with the random block design:
thus obtaining the following image:

 Trt1 = c("A","B","C")
 design.crd(trt=Trt1, r=3)
The result is the output below:
 > design.crd(trt=Trt1, r=3)
 $parameters
 $parameters$design
 [1] "crd"

 $parameters$trt
 [1] "A" "B" "C"

 $parameters$r
 [1] 3 3 3

 $parameters$serie
 [1] 2

 $parameters$seed
 [1] 1572684797

 $parameters$kinds
 [1] "Super-Duper"

 $parameters[[7]]
 [1] TRUE


 $book
  plots r Trt1
 1  101 1  A
 2  102 1  B
 3  103 2  B
 4  104 2  A
 5  105 1  C
 6  106 3  A
 7  107 2  C
 8  108 3  C
 9  109 3  B
As you can see the function takes only one argument for treatments and another for replicates. Therefore, if we need to include a more complex treatment structure we first need to work on them:
 Trt1 = c("A","B","C")
 Trt2 = c("1","2")
 Trt3 = c("+","-")

 TRT.tmp = as.vector(sapply(Trt1, function(x){paste0(x,Trt2)}))
 TRT = as.vector(sapply(TRT.tmp, function(x){paste0(x,Trt3)}))
 TRT.Control = c(TRT, rep("Control", 3))
As you can see we have now three treatments, which are merged into unique strings within the function sapply:
 > TRT
  [1] "A1+" "A1-" "A2+" "A2-" "B1+" "B1-" "B2+" "B2-" "C1+" "C1-" "C2+" "C2-"
Then we need to include the control, and then we can use the object TRT.Control with the function design.crd, from which we can directly obtain the data.frame with $book:
 > design.crd(trt=TRT.Control, r=3)$book
   plots r TRT.Control
 1  101 1     A2+
 2  102 1     B1+
 3  103 1   Control
 4  104 1     B2+
 5  105 1     A1+
 6  106 1     C2+
 7  107 2     A2+
 8  108 1     C2-
 9  109 2   Control
 10  110 1     B2-
 11  111 3   Control
 12  112 1   Control
 13  113 2     C2-
 14  114 2   Control
 15  115 1     C1+
 16  116 2     C1+
 17  117 2     B2-
 18  118 1     C1-
 19  119 2     C2+
 20  120 3     C2-
 21  121 1     A2-
 22  122 2     C1-
 23  123 2     A1+
 24  124 3     C1+
 25  125 1     B1-
 26  126 3   Control
 27  127 3     A1+
 28  128 2     B1+
 29  129 2     B2+
 30  130 3     B2+
 31  131 1     A1-
 32  132 2     B1-
 33  133 2     A2-
 34  134 1   Control
 35  135 3     C2+
 36  136 2   Control
 37  137 2     A1-
 38  138 3     B1+
 39  139 3   Control
 40  140 3     A2-
 41  141 3     A1-
 42  142 3     A2+
 43  143 3     B2-
 44  144 3     C1-
 45  145 3     B1-
A note about this design is that, since we repeated the string "Control" 3 times when creating the treatment structure, the design basically has additional repetition for the control. If this is what you want to do fine, otherwise you need to change from:
TRT.Control = c(TRT, rep("Control", 3)) to:
TRT.Control = c(TRT, "Control") This will create a design with 39 lines, and 3 controls.
Other possible designs are:
 #Random Block Design
 design.rcbd(trt=TRT.Control, r=3)$book

 #Incomplete Block Design
 design.bib(trt=TRT.Control, r=7, k=3)

 #Split-Plot Design
 design.split(Trt1, Trt2, r=3, design=c("crd"))

 #Latin Square
 design.lsd(trt=TRT.tmp)$sketch
Others not included above are: Alpha designs, Cyclic designs, Augmented block designs, Graeco - latin square designs, Lattice designs, Strip Plot Designs, Incomplete Latin Square Design
Update 26/07/2017 - Plotting your Design
Today I received an email from Kevin Wright, creator of the package desplot.
This is a very cool package that allows you to plot your design with colors and text, so that it becomes quite informative for the reader. On the link above you will find several examples on how to plot designs for existing datasets. In this paragraph I would like to focus on how to create cool plots when we are designing our experiments.
Let's look at some code:
 install.packages("desplot")
 library(desplot)
#Complete Randomized Design
 CRD = design.crd(trt=TRT.Control, r=3)$book
 CRD = CRD[order(CRD$r),]
 CRD$col = CRD$r
 CRD$row = rep(1:13,3)
desplot(form=TRT.Control ~ col+row, data=CRD, text=TRT.Control, out1=col, out2=row,
      cex=1, main="Complete Randomized Design")
After installing the package desplot I created an example for plotting the comple randomized design we created above.
The function desplot returns the following plot, which I think is very informative:
We could do the same with the random block design:
 #Random Block Design
 RBD = design.rcbd(trt=TRT.Control, r=6)$book
 RBD = RBD[order(RBD$block),]
 RBD$col = RBD$block
 RBD$row = rep(1:13,6)

 desplot(form=block~row+col, data=RBD, text=TRT.Control, col=TRT.Control, out1=block, out2=row, cex=1, main="Randomized Block Design")
thus obtaining the following image:

Final Note
For repeated measures and crossover designs I think we can create designs simply using again the function expand.grid and including time and subjects, as I did in my previous post about Power Analysis. However, there is also the package Crossover that deals specifically with crossover design and on this page you can find more packages that deal with clinical designs: https://cran.r-project.org/web/views/ClinicalTrials.html
Lovely article. Thanks
ReplyDeleteThank you for your post. This is excellent information. It is amazing and wonderful to visit your site.Great content as usual.Thank you so much.
ReplyDeleteExperiential Designers in Bangalore | Residential architects in Bangalore